
Monday, January 31, 2011
Sunday, January 30, 2011
Pitchout tips for Catchers
Yesterday's post described why a pitchout, even if the runner does not steal on the pitch, can be valuable and what pitchers can do to make their pitchouts more effective. Today I offer four tips for catchers on pitchouts.
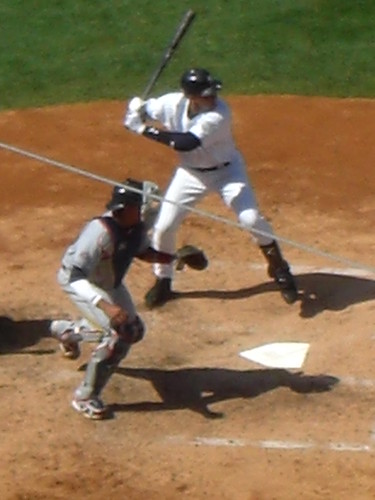
Peek at the runner. Many base stealers at the upper level can decide to steal on their own. They are given the "green light" which means they are allowed to steal when they want to. In an attempt to pick a good pitch to steal on (anything slower or downward breaking), many of these runners will take their lead at first base and peek in at the catcher's signs as he gives them to the pitcher. If the runner sees the pitchout sign, usually the fist or thumb, he won't go. Catchers need to be aware of this and take a look at the runner before the sign to see if he is peeking in. If he thinks the runner is, the catcher should try to hide the signs more or change them up.
Set up outside. As mentioned in yesterday's post, some pitchers have trouble throwing a pitchout to the proper spot. One way to help them is to give the sign and set up on the outside corner. The catcher's body is closer to the opposite batter's box which makes it more likely the pitchout will be thrown there instead of down the middle. Be careful though because a very smart runner may notice that a catcher does this and not steal.
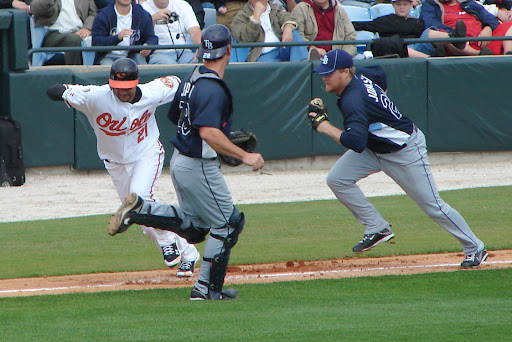
Angle out to catch. If you watch a MLB catcher carefully on a pitchout you'll notice he does not simply stand up and move straight to the side to catch the ball in the opposite batter's box. He angles forward as he moves to the side so that he catches the ball a foot or two quicker than if he just shifted straight to the side and waited for a full length throw. This also starts to build some momentum forward before catching the ball.
Timing. The timing of when to get up and angle out into the opposite batter's box is important as well. Too early may tip it off and too late defeats the purpose of a pitchout. It might vary based on each pitcher's delivery but the best time to start moving is when the pitcher's throwing hand starts to come forward in his delivery. That usually gets the ball and the catcher to arrive at the proper pitchout spot at the right time.
 |
| Make sure this guy is not looking in to steal your signs. (Photo by Computeress) |
Set up outside. As mentioned in yesterday's post, some pitchers have trouble throwing a pitchout to the proper spot. One way to help them is to give the sign and set up on the outside corner. The catcher's body is closer to the opposite batter's box which makes it more likely the pitchout will be thrown there instead of down the middle. Be careful though because a very smart runner may notice that a catcher does this and not steal.
 |
| This catcher correctly angles out and forward to receive the pitchout. (Photo by 2Eklectik) |
Timing. The timing of when to get up and angle out into the opposite batter's box is important as well. Too early may tip it off and too late defeats the purpose of a pitchout. It might vary based on each pitcher's delivery but the best time to start moving is when the pitcher's throwing hand starts to come forward in his delivery. That usually gets the ball and the catcher to arrive at the proper pitchout spot at the right time.
Saturday, January 29, 2011
Pitchout tips for pitchers
One of the things that pitchers and catchers rarely practice is pitchouts. Pitchouts can be very effective even if the runner does not steal. Obviously, if the runner goes the catcher has a better chance of throwing the runner out. Even if the runner doesn't go, it still puts the pitchout in the mind of runners and coaches in the future. For some, it might make them a little more tentative on stealing in the future if they know the potential for a pitchout exists.
Like everything else, pitch-outs are things that have to be practiced if they are to be successful. Mixing in a pitchout every five pitches or so when pitching and catching in the off-season is a great habit to get into. Here are some tips for pitchers on how to do it correctly in games and/or in practice:
Tomorrow's post: Pitchout tips for Catchers
Like everything else, pitch-outs are things that have to be practiced if they are to be successful. Mixing in a pitchout every five pitches or so when pitching and catching in the off-season is a great habit to get into. Here are some tips for pitchers on how to do it correctly in games and/or in practice:
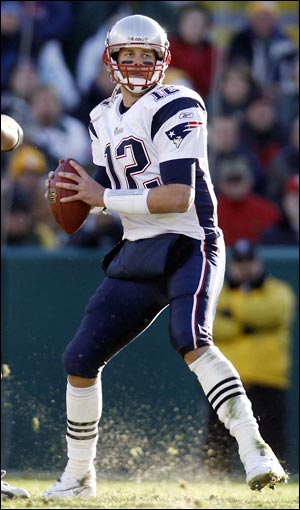
- Don't tip it off. Smart runners will not go if they think a pitchout is coming. Your delivery needs to be the same as any other pitch. Quickening up your delivery is ok to a certain degree. Too much and you're letting the runner know something is up.
- Shake off a pitchout sign. Nobody shakes off a pitchout. That's why you do it. It's another way of convincing a runner and batter that a pitchout is not coming. Obviously, the catcher needs to be in on the "fake shake-off."
- Give the runner some time. Some pitchers are so anxious to get the ball to the catcher that they quick-pitch. Smart runners won't go on a "quick-pitch." You want the runner to steal on a pitchout so come set and wait a little before delivering so the runner has a chance to get his normal lead and be comfortable.
- Throw at "the batter's" chest. This is the toughest part for pitchers. They are so trained to throw low strikes that on a pitchout many throw it over the plate and/or too low. Imagine there is a batter in the other batter's box and try to hit this "batter" right in the chest. That helps the throw to be wide enough and high enough for the catcher to handle easily.
 |
| Give the runner every indication that the pitch won't be a pitchout. |
Tomorrow's post: Pitchout tips for Catchers
Friday, January 28, 2011
Sacrifice bunting - square up for success
Spring training is right around the corner for pitchers and catchers in the Major Leagues. There are many things I love about this and one of them is you start to see photos and video clips of baseball again. Since the pitchers arrive first, many of the pictures show bullpen sessions, drills like covering first base, and bunting. Looking at these photos/clips is a good way for younger players to learn the fundamentals. That certainly is the case for bunting.
There are different theories as to how batters square to bunt. Some say square all the way around with your shoulders, hips, and feet squared to the pitcher. Some say keep your feet still and pivot your hips so just the batter's shoulders are squared to the pitcher. Basically, you do what your coach wants you to do. However, if your coach doesn't mind how you do it, here are two things to look for in the spring training photos and then incorporate into your bunting practice.
Bunt to first, square to first. When sacrifice bunting to the first base side (as a right-handed batter), move up in the box a little as normal and square your shoulders, hips, and feet at the first baseman. This allows the batter to angle the bat correctly towards the first base area before the pitcher has even released the ball. Problems occur when batters try to turn/angle the bat as the pitch is coming in. Many times the batter fouls off the pitch or bunts it back to the pitcher. Squaring to first angles the bat correctly without really even trying and allows the batter to concentrate on the pitch as opposed to the pitch and trying to angle the bat correctly at the same time.
Bunt to third, square to the pitcher. If your goal is to bunt to the third base side then square your shoulders to the pitcher. This enables the batter to angle the bat correctly so the ball goes to the third base side. As stated above, the batter does not want to be moving the bat into position as the pitch is coming in. Squaring the shoulders to the pitcher and angling the bat correctly allows the batter to just watch the ball with no extra bat movement needed as the pitch is coming in.
Note: Left-handed hitters would reverse this advice. When sac bunting to third, the lefty would square his body at the third baseman. When bunting to first, he would square his shoulders at the pitcher.
There are different theories as to how batters square to bunt. Some say square all the way around with your shoulders, hips, and feet squared to the pitcher. Some say keep your feet still and pivot your hips so just the batter's shoulders are squared to the pitcher. Basically, you do what your coach wants you to do. However, if your coach doesn't mind how you do it, here are two things to look for in the spring training photos and then incorporate into your bunting practice.
 |
| When bunting to first, square up to first |
Thursday, January 27, 2011
Rundowns - two priorities
If you are ever looking for a good indoor drill with your team, it's rundowns. With or without runners, rundowns are as simple as creating some lines of guys about 90 feet from each other. First guy up has the ball and runs to the other line, tosses the ball to the first guy in the opposing line and then goes to the end of that group's line. The relay style drill just goes back and forth until the coach has seen enough and can involve multiple lines of rundowns.
There are a number of little things that players should do to perform a rundown correctly but, except for two of them, I'll save them for a future post. Here are the two priorities that must be done in order for a rundown to work with the least amount of throws. A team can come up short in a few of the other little things but not these.
Get the runner to go full speed. It may take a throw or two to get him moving that fast but after you do, only one additional throw should be needed. A runner at full speed cannot stop, turn, and run in the other direction very easily. The slower the runner goes the more likely he is going to be able to change directions on each throw thus lengthening the play. More throws = more chance of errors for the team on defense. Any fielder that gets the ball must sprint at the runner to make him sprint also. Anything less and the advantage goes back to the runner.
Move forward to catch: The player who is receiving the toss from his teammate needs to be moving forward as he catches the ball, assuming the throw is accurate. As soon as the fielder sees the teammate about to release the ball, he takes a step forward to catch. When the runner is going full speed and the fielder moves forward as he catches the ball, the runner will usually just run into the tag since he cannot stop and turn around fast enough. Catching the ball standing still allows the runner more time to change directions because it takes time for the fielder to catch and then get started running. Moving forward to catch eliminates this lag time.
When practicing this drill, do it without runners first so players can focus on the two priorities - running as fast as they can and moving forward to catch. Introduce runners to the drill after the priorities are met.
There are a number of little things that players should do to perform a rundown correctly but, except for two of them, I'll save them for a future post. Here are the two priorities that must be done in order for a rundown to work with the least amount of throws. A team can come up short in a few of the other little things but not these.
 |
| Move forward to catch and sprint at the runner! (Photo by Jim Donten) |
Move forward to catch: The player who is receiving the toss from his teammate needs to be moving forward as he catches the ball, assuming the throw is accurate. As soon as the fielder sees the teammate about to release the ball, he takes a step forward to catch. When the runner is going full speed and the fielder moves forward as he catches the ball, the runner will usually just run into the tag since he cannot stop and turn around fast enough. Catching the ball standing still allows the runner more time to change directions because it takes time for the fielder to catch and then get started running. Moving forward to catch eliminates this lag time.
When practicing this drill, do it without runners first so players can focus on the two priorities - running as fast as they can and moving forward to catch. Introduce runners to the drill after the priorities are met.
Wednesday, January 26, 2011
Funniest manager / umpire interaction?
Studio 42 on the MLB Network had a show on the other night about umpiring. Lots of great stories about the sometimes funny, sometimes turbulent interactions between managers and umpires. Here are my two best true stories involving a manager and an umpire.
First Place
 This story involves a minor league manager. I became the pitching coach about a week after this occurred. While our manager was coaching third base, the opposing manager walked out to the mound to talk to his pitcher. Since the umpire never called time-out, our manager told the runner on third base to run home since the catcher went out to the mound also. The plate ump said "No, no, no ... come on coach, when a coach goes out on the field, time-out is automatic." The manager argued a little but eventually just said "Ok, fine." and the runner went back to third. Later in the game the other team had bases loaded and their batter hits a line drive in the right-center gap. Everyone is running around the bases and our manager runs out on the field IN THE MIDDLE OF THE PLAY waving his arms yelling "I'm on the field! TIME OUT! TIME OUT!" Immediately ejected after the play ended. True story!
Runner-Up:
I was on second base in college and the opposing coach came to the mound to talk to the pitcher. After a bit, the plate ump walked out like they usually do to get the game to keep moving. This is what was said:
Ump: "What are you going to do, Skip?"
Coach: "I'm taking him out."
Ump: "Which pitcher do you want?" (two were warming up - lefty and a righty)
Coach: "You pick one, they both stink."
Ump: (Points to the pen) "Give me the lefty!"
___________________________________________
What a beautiful game!
First Place
Runner-Up:
I was on second base in college and the opposing coach came to the mound to talk to the pitcher. After a bit, the plate ump walked out like they usually do to get the game to keep moving. This is what was said:
Ump: "What are you going to do, Skip?"
Coach: "I'm taking him out."
Ump: "Which pitcher do you want?" (two were warming up - lefty and a righty)
Coach: "You pick one, they both stink."
Ump: (Points to the pen) "Give me the lefty!"
___________________________________________
What a beautiful game!
Tuesday, January 25, 2011
Off-season hitting - an overlooked drill
This time of year, hitters are gearing up for the upcoming season probably by focusing on their hitting mechanics and taking a ton of swings. One valuable drill that tends to be overlooked is standing-in on pitchers. "Standing-in" involves a hitter standing in the batters box and doing everything they normally would do during an at-bat except swing. One of the tough things about this time of year, especially if you are indoors, is getting your timing down as a hitter. Even if you are receiving live batting practice, you probably are not being thrown pitches from the full distance or from a pitcher throwing with full mechanics and full velocity. Pitching machines can simulate velocity, breaking pitches, and distance but they don't generally allow hitters to practice their rhythm or timing all that well. This is why early in the season pitchers usually have the advantage. They have been able to practice virtually everything during the off-season even though they may have done it indoors. The only adjustment they make is just taking everything outside once the season starts. Hitters, on the other hand, can swing hundreds of times a day using tees, soft-toss, short toss, and pitching machines but it is not nearly the same as facing live pitching outside in a game-like situation. Although hitters are not swinging the bat, standing in allows hitters to get a game-like view of pitches being thrown in order to work on their rhythm and timing. If done correctly, standing in can decrease the adjustment time once they get outside.
Here are 10 tips to get the most out of it:
Here are 10 tips to get the most out of it:
- Ask permission. Most pitchers have no problem with batters standing in because it helps them also. However, some may not want you to stand in until they have worked on what they need to work on especially if it's a mechanical thing. Having a batter stand-in is a bit of an added distraction for pitchers so don't stand-in until they are ready.
- Wear a helmet. Obviously.
- Play games in your head. I indicated in many posts how important the mental side of a player usually has a big factor in making a player go from good to great. This drill is no different. Mentally, a player thinks he is in a real game. The crowd, runners on base, big game pressure, etc. are all a reality in the player's mind even though he may be in a gym somewhere. Pretend you are in different situations. Runner on second, no outs and look for a pitch to move the runner over. Runner on third, infield in, less than two outs. Look for a pitch up in the zone to drive to the outfield. Two strikes, have to put the ball in play. Never just go through the motions. You are practicing the mental side of your game as well.
- Know what's coming. Early on when you are standing-in, know what the pitcher is going to throw. You get a chance to see that pitch from start to finish without the need to hit it. You can take that info and use it against other pitchers.
- Don't know what's coming. Obviously, this is what you are going to do in a game so it's to your benefit to practice this way for at least some of the pitches. Ask the catcher to give signs instead of having the pitcher announce what pitch he is throwing. Like a game, focus on the release point and try to pick up spins, etc. to identify the pitch. Tell the pitcher if he is tipping off his pitches too soon. He needs that feedback too.
- Zoom in. When the pitcher is standing on the mound, look at the entire pitcher equally. As the pitcher starts his motion, narrow your vision/focus (zoom in) to eventually see only the ball and hand at his release point. Practice this visual drill because it's essential come game time.
- Focus on rhythm and timing. This is the big reason for standing-in. It enables the hitter to focus on the timing of their load, the stride, and the firing of the hips, hands, and bat. The batter works on the rhythm and timing of all this but just doesn't swing.
- "Use all fields". Make sure your mechanics, rhythm, and timing are not just geared towards pulling the ball. Doing #3 correctly helps with this.
- Track the ball to the glove. Pete Rose used to follow the ball all the way back to the catcher's glove when he took pitches. Check out the second pitch he sees in this clip of his record breaking at-bat. This is a good habit because it allows you to see how the ball moves during the last 10-15 feet of the pitch. Many times a pitch will look like a strike coming in but will move quite a bit in the last 5-10 feet and end up being a ball. This information is missed if the batter keeps his eyes directed in front of home plate when he takes the pitch.
- Get some variety. Stand in on multiple pitchers. Righties, lefties, 3/4 arm angles, over the top throwers, etc. Stand in on them all. You're going to see all types during the season.
Monday, January 24, 2011
Spring training - Focusing on the "little things."
I came across this article the other day in one of my files. I gave it out to my players a couple years ago. The article is dated March, 2006 but it certainly has relavence today for any player or coach preparing for the upcoming season. It also goes a long way to explain the Twins' success over the years in a smaller market with a much lower payroll than most other winners.
Click on the title.
Twins retool their fundamentals
Twins retool their fundamentals
Saturday, January 22, 2011
Tips for Long-tossing and/or "Long-throwing"
Disclaimer
There is an on-going debate in baseball circles about the value of long-tossing.
I know it's shocking to think that anything in baseball is debated.
(Yes, that's sarcasm if you weren't sure.)
Some love it, some hate it. This post does not get into that argument.
I'm in the "love long-tossing" camp and it's ok if you are not.
I saw a great MLB Network Diamond Demo on long-tossing (2nd half of clip) or what Mitch Williams calls "long-throwing." I like and agree with his explanation on the difference in terminology. In the Demo, Mitch mentions "walking into the throw." I have always prefered the method used by Roy Halladay in the following YouTube clip. He takes a step forward with his left foot but then hops behind with his right foot, steps, and throws. I like this better because it keeps the pitcher's front side closed longer. A good habit for a pitcher!
The next clip shows a long-tossing routine which includes what they call the "stretching out" phase and the "pulling down" phase. Some people see value in launching a high arching ball to stretch out and strengthen the arm but, like Mitch Williams, I don't like the idea of lifting the front side too much and leaning back to do it. That's not what pitchers do in a game so I'm reluctant to have pitchers do it in practice. I believe there is more value in throwing balls that are able to get to your partner on a hard line drive rather than a high arching one that travels 300+ feet. For most players, that might require maxing out at around 150-200 feet depending on your arm strength. I guess that means I like their "pulling down" phase better.
Over time, pitchers usually develop a long-tossing/long-throwing routine that works best for them.
Friday, January 21, 2011
Protecting pitchers
Today's post is a continuation of yesterday's in which I described the problems and a remedy for not finishing your pitches correctly. Today I focus on what picthers can do to better prepare themselves for a ball hit directly back to them. Below are three important tips to keep pitchers safer on the mound.
Finish balanced. A pitcher who has good balance and body control when they finish has a better chance to react to anything hit back at them. Falling in any direction after the pitch is a sign that their balance needs work. It not only will make you a better pitcher, it will keep you safer as well.
Finish with your head up and eyes level. The eyes see best when level. Try walking or playing video games with your head tilted to the side. Very difficult. A tilted head/set of eyes has the potential for serious injury if the pitcher's vision or perception is off even a little. Finishing a pitch with your head/eyes tilted is a dangerous habit.
Finish with the glove near your hip. A pitcher's best protection is his glove. All pitchers should end up with outside of their glove on or near their glove side hip. I tell young pitchers that it is similar to a seat belt of a car. The first thing you do to protect yourself in a car is to pull the seat belt down to your hip and click it. A glove that ends up at your hip keeps the finish point more compact and balanced but also puts the glove in a better position to quickly get it out in front to catch or deflect balls hit back. Some pitchers finish with their gloves well behind their body. In that case, there is no way the pitcher is going to catch a shot hit right back. They can only hope it doesn't hit their head.
Tomorrow's post: Long-tossing and "Long-throwing"
Finish balanced. A pitcher who has good balance and body control when they finish has a better chance to react to anything hit back at them. Falling in any direction after the pitch is a sign that their balance needs work. It not only will make you a better pitcher, it will keep you safer as well.
Finish with your head up and eyes level. The eyes see best when level. Try walking or playing video games with your head tilted to the side. Very difficult. A tilted head/set of eyes has the potential for serious injury if the pitcher's vision or perception is off even a little. Finishing a pitch with your head/eyes tilted is a dangerous habit.
 |
| Greg Maddux. One of the best fielding pitchers ever. Balanced, head up, eyes level, glove on the hip. |
Tomorrow's post: Long-tossing and "Long-throwing"
Thursday, January 20, 2011
Pitching mechanics - finish before you field!
 |
| Photo 1: A common Little League finish. |
- The distance from the mound to the plate is shorter.
- Young players are still developing the skills needed to catch balls hit at them.
- Reaction times are slower so safety on batted balls at that level is more of a concern.
- The longer distance between the mound and home plate make it more important for pitchers to use their whole body when pitching - especially their mid-section.
- Many pitchers have developed the habit of not using their whole body.
Only after pitchers get to this point should they concern themselves with fielding. In reality, when contact is made by the hitter (about the time Photo 2 was taken), the pitcher will never be in the fielding position if he is following through fully. That is why major league pitchers, even the best fielders, still get hit with line drives and ground balls back at them every now and then.
So it becomes a trade-off. Finish your pitch correctly to be more effective with less injuries but suffer a bit defensively or don't finish well in order to field but suffer more arm stress and lower performance.
Your pick.
Tomorrow's post will answer the question ...
"So what can pitchers do to protect themselves if they shouldn't be in
a position to field when the ball is hit?"
Wednesday, January 19, 2011
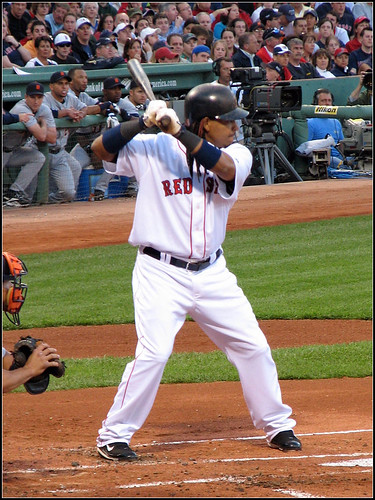
Batting stance - the importance of a good base
**Sorry, I believe some of the pictures did not appear correctly. Hopefully it works now. **
When teaching hitting, I'm a believer in taking a ground up approach. That is, start with the feet and gradually move up. It really won't matter how strong the player is or how quick his hands are unless his body is balanced in a good base.
Regardless of the sport you play, a strong base is essential. A good, strong base enables athletes to get the best balance, power, quickness, left-right movement, up-down movement, and front-back movement. This is why many coaches refer to the proper body position as the "athletic position." These pictures all show athletes of different sports in this position:
Here are the details of this position:
- Feet wider than the shoulders
- Knees slightly bent
- Slight bend at the waist
- Feet flat but weight is more on the front half - balls of the feet.
- Head still and centered between the feet, eyes level.
A batting stance does not need to be any more complicated than getting into this athletic position and putting a bat in your hands.
You will see some hitters start with their feet more narrow ...
... but even those hitters get their body into the athletic position before contact.

If your hitting needs work, go back to the basics and start by looking at your feet.
Tuesday, January 18, 2011
Four seam fastball grip
Here's a tip for anyone looking to improve their four-seam fastball, especially if the player is younger and now has a hand big enough to do more advanced grips on the ball.
Have a player hold a four seam grip in front of them so they can clearly see the seams. The seams on the ball will either form a regular "C" or a backwards "C" depending on what side of the ball the player grips. A right-hander should try the grip which uses the "backwards C" side of the ball. Here's why. The two fingers placed on top of the ball are the index finger and the middle finger. The middle finger is almost always longer than the index finger. When looking at the "backwards C," the seam starts low and gradually curves up and around the ball. When a right-hander places both fingers on the "backwards C," the shorter index finger goes on the lower seam and the middle finger gets to grip the higher part of the seam. Both fingers get a good grip of the seam. Unless the ball is turned slightly, a right-hander who holds a four-seam grip with the "regular C" side of the ball is more likely to have the pressure point of his middle finger be above the seam and on the flat part of the ball. If you have to turn the ball to get both fingers on the seam, it really isn't a true four-seamer. Of course, for the same reasons, a left-hander would want to try a "capital C" grip.
Always remember that there are virtually no absolutes in baseball. I don't want to imply that the tip above is a definite "must" for all pitchers. There are pitchers who hold a four-seam fastball unlike what I mentioned above who are very comfortable and effective. As a right-hander myself, I would often use the "turned, capital C" grip to throw a cut fastball. Everyone is different.
As I explained in my off-season pitching tips post, tinkering with new grips can be a good thing. A good hard four-seam fastball has value at any level. If you are struggling with yours or just willing to try something different, give my tip a shot. It might just turn your four-seam fastball from good to great.
Technorati: QU2TWTQE4MP9
Monday, January 17, 2011
How to tag base runners
On the surface, it seems pretty basic. Catch the ball and make the tag. However, like everything else in baseball, there's a lot of little things going on under the surface if you dig a little deeper. Here are 10 tips to make sure your tagging of runners is more successful.
1. Footwork. In a previous post on second base mistakes, I talked about footwork issues like getting to the base and straddling the bag. Those same principles apply to any base. Check it out to get keys about footwork before receiving the throw.
2. Keep it in front. Also stated in the previous post was the idea of making sure the ball does not get past you. A coach will not get too upset if a runner is safe at a bag. He will get very upset if the ball gets past the fielder and all runners move up another base. Of course, the ultimate goal is to try to make the catch and apply the tag but fielders also need to know when to cut the losses, forget the runner and the tag, and just make sure the ball doesn't get past them. There are certainly going to be times when the throw is just too bad to stop but try your best
3. Let the ball come to you. For this tip, we'll start by assuming that the throw to you is a good one. If it isn't, remember tip #2. Fielders sometimes make the mistake of reaching out too far with their glove to catch a thrown ball before making a tag. They then have to bring the glove back and down to tag the runner. A thrown ball will travel faster than your ability to do this. Let the ball travel to you so that after the catch you are able to just go straight down instead of back-and-down to apply the tag.
4. Glove above the ball. When possible, position your glove above the thrown ball so that you are catching the ball with your glove on the way down. If your glove is below the throw, you'll have to raise the glove to catch and then change direction to bring the glove down to tag. Keeping the glove above the ball allows you to catch and tag in the same downward motion.
5. Capital V. This tip is connected to #3. Reaching out to catch a ball promotes a "sweep" tag. Since you are allowing the ball to come to you, tag with a straight down and straight up motion. Think capital "V" instead of a capital "U" It's a little quicker.
6. Fingers tips forward. Many fielders tag sliding runners with the back of their glove so the runners foot doesn't knock the ball out. The problem with this is that the back of the hand and sometimes the index finger are exposed to the spikes. Try tagging with the fingers of the glove facing the runner. This still protects the ball but also protects any exposed parts of the glove hand.
7. One hand. Two handed tags are usually reserved for catchers and also little kids who are still learning to catch the ball safely and properly. One handed tags are quicker so as players get older, they should be using one hand.
8. A dead out. Occasionally, a runner will be out by quite a distance. If the ball gets to the bag well in advance of the runner, catch the ball and place the glove straight down on the ground in front of the bag. Don't assume the runner is going to give up. If he slides, he'll do it right into your glove. If he gives up (more likely), move forward towards the runner and bring the glove up to tag him. Just bringing the glove up - without moving forward - may allow the runner to quick slide at the last moment and get under the tag.
9. Stay low. This mainly applies to catchers because of a possible collision at the plate but it's good advice for all fielders on a tag play. Should a runner lose his mind and try to run over a fielder on a tag play, the fielder is much safer if he is lower than the runner. This type of collision will almost never happen to a fielder but you never want to assume it won't.
10. Re-tagging. We've all seen this play .. a runner slides and is tagged. The runner continues sliding past the bag and the fielder, seeing that the runner has slid past the bag, goes after him again. The runner beats the second tag and the umpire calls him safe. Why? Because when you re-tag a runner, you are sending the message to the ump that you missed him the first time. Resist the temptation to re-tag unless you are positive the runner will be out again on the re-tag.
Technorati Code: PMEX4EYSG3QM
 |
| Evan Longoria does whatever he can to keep the throw from getting past him.[DIRK SHADD | St. Petersburg Times] |
4. Glove above the ball. When possible, position your glove above the thrown ball so that you are catching the ball with your glove on the way down. If your glove is below the throw, you'll have to raise the glove to catch and then change direction to bring the glove down to tag. Keeping the glove above the ball allows you to catch and tag in the same downward motion.
5. Capital V. This tip is connected to #3. Reaching out to catch a ball promotes a "sweep" tag. Since you are allowing the ball to come to you, tag with a straight down and straight up motion. Think capital "V" instead of a capital "U" It's a little quicker.
 |
| Glove fingers forward. (AP Photo/LM Otero) |
7. One hand. Two handed tags are usually reserved for catchers and also little kids who are still learning to catch the ball safely and properly. One handed tags are quicker so as players get older, they should be using one hand.
8. A dead out. Occasionally, a runner will be out by quite a distance. If the ball gets to the bag well in advance of the runner, catch the ball and place the glove straight down on the ground in front of the bag. Don't assume the runner is going to give up. If he slides, he'll do it right into your glove. If he gives up (more likely), move forward towards the runner and bring the glove up to tag him. Just bringing the glove up - without moving forward - may allow the runner to quick slide at the last moment and get under the tag.
10. Re-tagging. We've all seen this play .. a runner slides and is tagged. The runner continues sliding past the bag and the fielder, seeing that the runner has slid past the bag, goes after him again. The runner beats the second tag and the umpire calls him safe. Why? Because when you re-tag a runner, you are sending the message to the ump that you missed him the first time. Resist the temptation to re-tag unless you are positive the runner will be out again on the re-tag.
Technorati Code: PMEX4EYSG3QM
Sunday, January 16, 2011
Best mound conversation ever
The other day a friend asked me "what do coaches tell pitchers when they go to the mound?" It reminded me of the best mound conversation I ever heard. First, here's some background on the story.
I was playing shortstop at the time but because I had pitched in college as well, I always was interested in what pitching coaches told their pitchers so I would frequently walk in to the mound to hear what was being said. The pitcher in this story was one of the best all-round athletes I ever played with. He threw very hard but early in his pro career he frequently just tried to throw the ball past everyone. It took him a while to learn to pitch instead of just throw. Many conversations by our pitching coach didn't seem to be all that effective. In short, he drove our pitching coach nuts. One night, the pitcher was again stuck in that strategy and was struggling with his command. The pitching coach decided on a different approach. He called time, walked to the mound and said the following:
He then patted him on the butt and jogged off the field leaving the pitcher completely bewildered and me laughing (with my glove up in front of my face) all the way back to shortstop.
I don't know if it tops the wedding gift / animal sacrifice meeting in the movie Bull Durham, but I sure liked it!
Have any good stories of your own?
I was playing shortstop at the time but because I had pitched in college as well, I always was interested in what pitching coaches told their pitchers so I would frequently walk in to the mound to hear what was being said. The pitcher in this story was one of the best all-round athletes I ever played with. He threw very hard but early in his pro career he frequently just tried to throw the ball past everyone. It took him a while to learn to pitch instead of just throw. Many conversations by our pitching coach didn't seem to be all that effective. In short, he drove our pitching coach nuts. One night, the pitcher was again stuck in that strategy and was struggling with his command. The pitching coach decided on a different approach. He called time, walked to the mound and said the following:
"Ok, here's what I want you to do. Keep trying to throw as hard as you can, don't get ahead of batters, stay up in the zone, don't change speeds, and let's see just how long we can be out here tonight."
 |
| "...we're dealing with a lot of **** here." |
I don't know if it tops the wedding gift / animal sacrifice meeting in the movie Bull Durham, but I sure liked it!
Have any good stories of your own?
Saturday, January 15, 2011
How to throw more strikes
How many kids have heard their coach, parent, etc say “Come on Johnny, throw strikes!” while on the mound?
The body language of the kid shouts "Gee Coach, I didn't know that. All this time I was out here trying to throw balls until now. Thanks for the advice!"
The point is, every pitcher tries to throw strikes. How to throw more strikes is what I cover here. Certainly there are mechanical issues that need to be ironed out in many cases. That being said, throwing strikes at any level has much to do with a pitcher's mind set prior to throwing the ball. A flawed strategy - usually a too complicated one - is a big cause of failing to throw strikes. The flawed strategy typically involves trying to get the batter to miss the ball.
In my opinion, young players of all ages and abilities can benefit by aiming for the center of the plate (and low) on all their pitches until they are well ahead in the count (ex. 0-2, 1-2). This is helpful because it gives the pitcher, particularly the young pitcher, more room for error with each pitch. Most players do not have the talent to put the ball exactly where they want it, whenever they want to. Most kids also don't have the velocity to pitch up in the strike zone that often either. All other “mortals” need a different approach.
A home plate is 17 inches across. That means a pitcher who aims for the center of the plate and low can miss the middle of the plate by up to 8 1/2 inches to the left or to the right of the target (sometimes more depending on the ump) and still have it called a strike. In fact, most pitchers will typically not put the ball exactly where they want it. On a first pitch fastball for example, a pitcher who aims for the center rarely will throw it exactly down the middle. Movement and /or inaccuracy will cause the ball to be off-center by several inches. As long as it doesn’t miss by more than about 9 inches, it will be called a strike and the pitcher starts with an O-1 count. If a pitcher aims for, let’s say, the outside corner on the first pitch, he must be perfect in his accuracy (not likely) for it to be an outside corner strike. If he misses outside by even one inch, it's off the plate and probably will be called a ball. If he misses the other way, the ball is getting closer to the center of the plate which is easier to hit. Aim for the center and the pitcher has a lot more room for error. When the pitcher gets to an 0-2 or 1-2 count, he can then go for the corners to get the batter to chase a bad pitch. If the count goes 2-2 or 3-2, he should go back to aiming for the center.
The priority for pitchers is to throw strikes and pitch to contact. There are only a few situations in baseball where a pitcher absolutely tries for the strikeout. Runner on third base, one out would be an example. All other times, the pitcher should want the batter to hit the ball. The pitcher's job is to throw it low so that the batter has less of a chance of hitting it well. Ironically, when pitchers take this approach, many times their strikeout totals go up!
Pitching, especially at the younger ages, does not have to be that complicated. Unfortunately, some people still seem to think it does.
"Throw strikes, Babe Ruth is dead!"
The body language of the kid shouts "Gee Coach, I didn't know that. All this time I was out here trying to throw balls until now. Thanks for the advice!"
The point is, every pitcher tries to throw strikes. How to throw more strikes is what I cover here. Certainly there are mechanical issues that need to be ironed out in many cases. That being said, throwing strikes at any level has much to do with a pitcher's mind set prior to throwing the ball. A flawed strategy - usually a too complicated one - is a big cause of failing to throw strikes. The flawed strategy typically involves trying to get the batter to miss the ball.
In my opinion, young players of all ages and abilities can benefit by aiming for the center of the plate (and low) on all their pitches until they are well ahead in the count (ex. 0-2, 1-2). This is helpful because it gives the pitcher, particularly the young pitcher, more room for error with each pitch. Most players do not have the talent to put the ball exactly where they want it, whenever they want to. Most kids also don't have the velocity to pitch up in the strike zone that often either. All other “mortals” need a different approach.
The priority for pitchers is to throw strikes and pitch to contact. There are only a few situations in baseball where a pitcher absolutely tries for the strikeout. Runner on third base, one out would be an example. All other times, the pitcher should want the batter to hit the ball. The pitcher's job is to throw it low so that the batter has less of a chance of hitting it well. Ironically, when pitchers take this approach, many times their strikeout totals go up!
Pitching, especially at the younger ages, does not have to be that complicated. Unfortunately, some people still seem to think it does.
"Throw strikes, Babe Ruth is dead!"
Thursday, January 13, 2011
Professional baseball scouting - an interview
In many of my previous posts I mention scouts or scouting with regards to what they look for or how they think. I thought it would be appropriate to hear things straight from the mouth of a real professional baseball scout.

Coach McCreary: Thanks for taking the time to talk to us at Baseball By The Yard. First off, when you evaluate players, what are you looking at and what kind of evaluation system do you use?
Rex: Scouts look for and evaluate, on a scale of 2 to 8, the five tools of players: fielding, running, hitting, power, and arm strength. I actually look for a sixth as well which is a player’s “make-up.”
(this previous post explains what he means by "make up")
Coach: What do the numbers 2 - 8 mean to you?
Rex: The rating is different depending on whether the player is a position player or a pitcher.
This is what the numbers mean when we rank a position player:
2 = Non-player; poor; possible minor league batter under .220
3 = Well Below average; possible MLB back up; .220-.240
4 = Below average; possible quality utility guy or 4th outfielder on a team; .241-.260
5 = Average; possible regular MLB player with enough defense and offense to play
everyday; .260-.280, 13-19 HR’s; running time - home to 1st around 4.3 sec.
(righthander) & 4.2 sec. (lefthander)
everyday; .260-.280, 13-19 HR’s; running time - home to 1st around 4.3 sec.
(righthander) & 4.2 sec. (lefthander)
6 = Above average; possible quality regular; .280-.299
7 = Well above average; possible MLB All-Star w/consistency
8 = Outstanding; best in the game; .320+
These are the numbers for a pitcher:
2 = 84mph or below
3 = 85 – 86 mph
4 = 87 – 88 mph
5 = 89 – 91 mph
6 = 92 – 93 mph
7 = 94 – 95 mph
8 = 96+
Coach: During the peak playing months, what would a typical day of a scout look like?
Rex: We are either on the road driving long hours to see a game, watching two or maybe three games a day, on a plane to see a game, on the phone, in a hotel waiting for a game, or on the computer writing reports.
Coach: Pro players try to move up the minor league ladder (Rookie, A, AA, AAA) and
eventually to the major leagues. What are the levels a scout may move through?
Rex: Scouts usually start off as a part-time scout for a local area. Next would be a full-time scout in a larger area, then a cross-checker who may cover all of the East or West coast for example, then comes national cross-checker, and finally assistant scouting director or scouting director for an entire organization.
Coach: Are there any positions you would like to hold in the future?
Rex: I just would love to keep moving up as far as I can go in the game.
Coach: Does your professional playing experience help you in scouting?
Rex: I think so. Playing ten years in the minor leagues, reaching as high as AAA, participating in Instructional League, the Arizona Fall League, playing internationally, and playing with and against players that have played in the big leagues, helps me draw comparisons to talent as well as "makeup" when evaluating players. However, there are many scouts that have never played professional baseball and are excellent scouts/evaluators.
Coach: What do you like best about scouting?
Rex: The best thing is probably making a kid's life-dream come true by signing him to his first pro contract and then seeing him make it all the way through to the Major Leagues.
Coach: What is the worst thing about scouting?
Rex: Job security. Most scouts usually have year to year contracts. Sometimes there is turnover in the organization and you may find yourself out of a job pretty quickly.
Coach: What words of advice do you have for young players hoping to one day make it into the professional levels?
Rex: Don't ever give up on your dreams. Don't let ANYONE tell you you can't play at the next level. Keep working hard to improve on your deficiencies in the game. Always hustle and play hard because you never know who's watching.
Coach: Thanks again Rex and best of luck this coming baseball season.
Baseball By The Yard would like to do future interviews for the blog with people in and around the game. If there is a person or position you'd be interested in hearing from, send your suggestions to baseballbytheyard@gmail.com.
Wednesday, January 12, 2011
Indoor drills for outfielders
Of all the positions on the field, the outfield positions tend to get shafted the most with regards to indoor practice. I'm based outside of Philadelphia so we routinely have to spend many practice days indoors because of rain or snow. Farther up north is certainly worse so don't feel the need to shed tears for me.
If it is not possible for outfielders to find a clear, dry area to practice on (other field, parking lot, etc), try these indoor drills that work basic outfield skills. As always, if you have other drills, pass them along!
Pass drill: Each outfielder gets a ball and stands in line. One at a time, an outfielder jogs towards a coach and flips the ball to him. The player runs around the coach and goes out for a pass. The coach throws a pass with the ball and the outfielder runs it down. The next player than goes and the drill continues. This works on running technique, glove technique, catching on the run, keeping your head still when running, eye-hand coordination, and timing. After each player has gone twice, have players approach the coach from the other side so the player is running and looking over the other shoulder this time.
Corner drill: This drill replicates a ball hit to an outfielder's left or right. Players line up on one side of the gym (to the left or right corner of a base-line on a basketball court for example). A coach rolls a ball towards the other corner of the gym. The outfielder cuts the ball off (running down the base-line towards the opposite corner) before it hits the wall, turns, and throws to a middle infielder who acts as a cut-off man at the other end of the gym. This works proper angles, footwork before and after catching the ball, and hitting the cut-off man.
Wall drill: An outfielder stands in the center of the gym and sets up as if a pitch is being thrown. The coach tosses a ball over the outfielders head so the ball rolls to the wall. The outfielder turns and chases the ball, fields it off the wall and throws it to a cut-off man at the other end of the gym. This works the footwork going back on the ball, reading balls off the wall, getting to the proper side of the ball before catching (right side if right-handed, left side if left-handed), and throwing accuracy to the cut-off man.
Zig-Zag drill: Outfielders line up next to and to the left of a coach at one end of the gym. A player runs straight ahead and looks over his right shoulder for the throw. When the coach yells "now" the player whips his head around to his left shoulder as the coach tosses the ball over that shoulder. The outfielder tracks it down and catches the ball. This drill mimics a ball hit over the outfielders head that curves or is wind-blown to the other side of the outfielder. Players should quickly whip their chin/eyes around to the other shoulder (yes, they will lose sight of the ball for a split second) so that they continue running with the same forward mechanics. After a few turns apiece, have players line up on the other side of the coach to practice the other side as well.
Come-up throwing drill: Players line up on one side of the gym facing the other side. A coach starts the process by throwing a ball at the far wall. The first player in line charges the ball that is now bouncing towards him, gloves it, and throws it to the far wall. The ball bounces off the wall and the next outfielder then charges and does the same. The round-robin drill can continue as long as the coach wishes. This drill works on charging balls, footwork before and after catching, being aggressive through the ball, proper arm angle (over-the-top) when throwing, and accuarcy.
First-step drill: Place four cones on the four corners of the basketball court. One outfielder stands in the middle of the court - the others off to the side. The player sets up as if a pitch is being thrown and a coach points to a cone. The player reacts as if a ball is hit towards the cone. A coach could even toss a ball towards a particular cone for the player to try to catch. This works on first step quickness to the ball, proper angles, and aggressiveness.
Note: All the drills mentioned above certainly work outside as well. Modify them for your needs and the ability level of the players you work with. Create some new ones of your own!
If it is not possible for outfielders to find a clear, dry area to practice on (other field, parking lot, etc), try these indoor drills that work basic outfield skills. As always, if you have other drills, pass them along!
Pass drill: Each outfielder gets a ball and stands in line. One at a time, an outfielder jogs towards a coach and flips the ball to him. The player runs around the coach and goes out for a pass. The coach throws a pass with the ball and the outfielder runs it down. The next player than goes and the drill continues. This works on running technique, glove technique, catching on the run, keeping your head still when running, eye-hand coordination, and timing. After each player has gone twice, have players approach the coach from the other side so the player is running and looking over the other shoulder this time.
Corner drill: This drill replicates a ball hit to an outfielder's left or right. Players line up on one side of the gym (to the left or right corner of a base-line on a basketball court for example). A coach rolls a ball towards the other corner of the gym. The outfielder cuts the ball off (running down the base-line towards the opposite corner) before it hits the wall, turns, and throws to a middle infielder who acts as a cut-off man at the other end of the gym. This works proper angles, footwork before and after catching the ball, and hitting the cut-off man.
Zig-Zag drill: Outfielders line up next to and to the left of a coach at one end of the gym. A player runs straight ahead and looks over his right shoulder for the throw. When the coach yells "now" the player whips his head around to his left shoulder as the coach tosses the ball over that shoulder. The outfielder tracks it down and catches the ball. This drill mimics a ball hit over the outfielders head that curves or is wind-blown to the other side of the outfielder. Players should quickly whip their chin/eyes around to the other shoulder (yes, they will lose sight of the ball for a split second) so that they continue running with the same forward mechanics. After a few turns apiece, have players line up on the other side of the coach to practice the other side as well.
Come-up throwing drill: Players line up on one side of the gym facing the other side. A coach starts the process by throwing a ball at the far wall. The first player in line charges the ball that is now bouncing towards him, gloves it, and throws it to the far wall. The ball bounces off the wall and the next outfielder then charges and does the same. The round-robin drill can continue as long as the coach wishes. This drill works on charging balls, footwork before and after catching, being aggressive through the ball, proper arm angle (over-the-top) when throwing, and accuarcy.
First-step drill: Place four cones on the four corners of the basketball court. One outfielder stands in the middle of the court - the others off to the side. The player sets up as if a pitch is being thrown and a coach points to a cone. The player reacts as if a ball is hit towards the cone. A coach could even toss a ball towards a particular cone for the player to try to catch. This works on first step quickness to the ball, proper angles, and aggressiveness.
Note: All the drills mentioned above certainly work outside as well. Modify them for your needs and the ability level of the players you work with. Create some new ones of your own!
Subscribe to:
Posts (Atom)